Address
30 N Gould St.
Suite R, Sheridan, WY 82801, USA
Best Injection Sites for Semaglutide: Where and How to Inject Safely
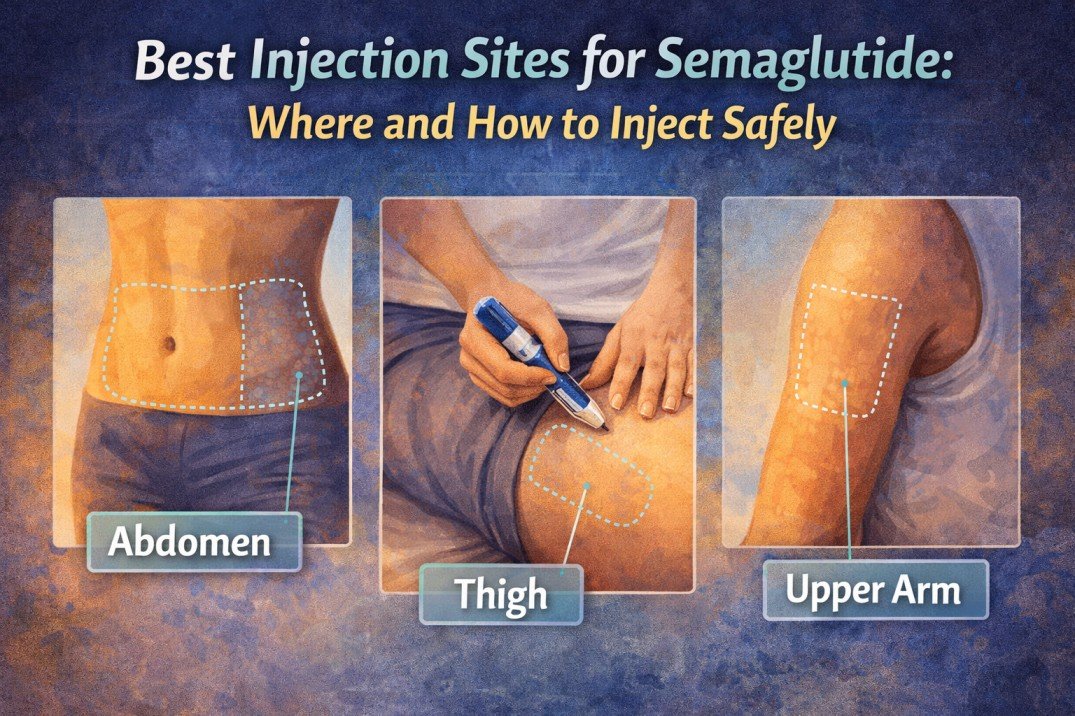
You can inject semaglutide under the skin in your abdomen, upper thigh, or the back of your upper arm. Rotating those sites helps prevent irritation and scar tissue.
Use a subcutaneous injection in those areas, change the exact spot each time, and follow simple hygiene and needle technique to stay safe and get consistent results.
This post will show exactly where to place the shot and how to inject step by step. You’ll also see how to pick and rotate sites based on comfort and medical factors.
You’ll learn what to watch for if a site looks red or painful, and when it’s time to get medical advice.
Key Takeaways
- Use the abdomen, thigh, or back of the upper arm and rotate spots each dose.
- Follow simple prep and injection steps to reduce skin problems and ensure consistent dosing.
- Check sites regularly and contact a provider for unusual pain, swelling, or infection.
Overview of Semaglutide Injections
Semaglutide comes as a once-weekly shot under the skin. You’ll need to pick the right site, rotate spots, and use the correct dose and device for safe use.
Importance of Proper Injection Technique
The right technique lowers pain, skin reactions, and the chance of incorrect dosing. Inject semaglutide subcutaneously—just under the skin, not into a muscle.
Common sites include the abdomen, front of the thigh, and outer upper arm. Rotate the exact spot each week to avoid lumps or hard skin.
Clean the skin with an alcohol wipe and let it dry before injecting. Pinch a small fold of skin if needed, especially on the thigh or arm, to make sure you’re in the fatty layer.
Follow the device instructions for needle angle and depth. Hold the pen or syringe steady for the time the manufacturer recommends to ensure you get the full dose.
Toss used needles in a sharps container—never reuse them.
Types of Semaglutide Formulations
Semaglutide comes in prefilled pens and single-dose syringes. Pens are the most common for home use, with fixed or adjustable dosing depending on the product.
Some pens require dialing the dose, while others come with one weekly dose pre-set. Prefilled syringes usually arrive ready to use, but you might need to attach or remove a cap first.
You’ll see different concentrations and devices branded for weight loss (Wegovy) or diabetes (Ozempic). Stick to your prescription label. Don’t mix formulations or change devices without advice from your prescriber or pharmacist.
Choosing the Best Injection Sites for Semaglutide
Pick a spot you can reach easily, rotate regularly, and keep at least 2 inches away from scars or the belly button. Comfort, steady absorption, and avoiding skin problems matter most.
Abdomen
The abdomen often gives the most consistent absorption. Inject into the fatty area at least 2 inches (about two finger widths) from your belly button.
Use the area between your lower ribs and the top of your pelvic bone, spreading injections around the left and right sides. Rotate sites weekly and avoid repeating the exact spot within a month.
This lowers the chance of lumps, bruises, or skin hardening. Clean the skin with soap or an alcohol swab if advised, pinch up a fold of fat if you have little subcutaneous tissue, and insert the needle at a 90-degree angle unless your pen instructions say otherwise.
Thigh
The front of the thigh works well if you prefer a larger surface for rotation. Inject into the middle third of your upper thigh, between the hip and the knee.
Use alternate spots on each thigh to change sides each week. Press gently and inject smoothly to reduce pain and bruising.
Thigh injections can be a bit more uncomfortable for some people. Try different spots and depths to see what feels best.
Avoid injecting into bruises, scars, or areas with skin irritation.
Upper Arm
The back of the upper arm is an option when you need privacy or can’t reach your abdomen or thigh. Inject into the fatty area on the back of your upper arm, midway between the shoulder and the elbow.
You might need help from someone else the first few times. Rotate between the left and right arm and avoid injecting too close to the shoulder joint.
Use short, controlled movements and steady pressure. If you notice swelling, redness, or persistent soreness, switch to abdomen or thigh until it heals.
How to Inject Semaglutide Safely
Prepare the dose, pick a clean site, and inject just under the skin. Sticking to a simple routine each time can really reduce pain, infection, and skin problems.
Step-by-Step Injection Procedure
- Wash your hands with soap and water for 20 seconds and dry with a clean towel.
- Check the medication: confirm the drug name, dose, and expiration date on the pen or vial.
- If using a pen, attach a new needle tip. Prime the pen if your product instructions require it to remove air.
- Choose a site: abdomen (at least 2 inches from the belly button), front of the thigh, or the outer upper arm. Rotate sites each week.
- Pinch a fold of skin gently with two fingers to lift subcutaneous tissue away from muscle.
- Insert the needle at a 90-degree angle unless your provider advised 45 degrees for very thin skin.
- Press the injection button or push the plunger slowly. Hold the needle in place for 5–10 seconds to ensure full dose delivery.
- Withdraw the needle straight out and apply gentle pressure with a sterile gauze; don’t rub.
- Dispose of the used needle in a sharps container immediately.
Best Practices for Hygiene
- Clean the skin with a single-use alcohol swab in a circular motion and let it air dry for about 10–15 seconds.
- Avoid touching the cleaned spot again before injecting to reduce contamination risk.
- Use a new, sterile needle for every injection. Never reuse needles or share pens.
- Keep pens and vials stored according to the label—usually refrigerated before first use and room temperature during daily use—then discard after the recommended period.
- If you see redness, swelling, or drainage at the site that worsens or lasts more than a few days, contact your healthcare provider.
- Keep a log of injection sites and dates to ensure proper rotation and to spot any skin reactions early.
Factors Affecting Injection Site Choice
Pick a site that gives steady absorption, causes the least irritation, and fits your body shape and daily routine. Pay attention to skin condition, fat layer thickness, and any past injections or scars when deciding where to inject.
Skin Health and Suitability
Check the skin at each site before injecting. Avoid areas with rashes, redness, open wounds, scabs, bruises, or active infections.
Injecting into unhealthy skin can slow absorption and raise the risk of irritation or infection. Look for skin that is clean, intact, and free of lumps.
If you notice hard or doughy areas from past injections (lipohypertrophy), don’t inject there—those spots absorb medication unevenly. Mark or avoid any scars, moles, or recent injection spots for at least a week.
If your skin is dry or flaky, gently clean it with soap and water and let it dry. Don’t rub alcohol until it stings; that can make skin fragile.
If you have persistent problems like frequent bruising or recurring irritation, let your prescriber know.
Body Composition
Pick fatty areas where the needle will reach the subcutaneous layer but not muscle. Typical options are the abdomen (at least 2 inches from the navel), the front or outer thigh, and the back of the upper arm.
Each site absorbs a bit differently; the abdomen usually absorbs fastest. If you have low body fat, pinch a larger fold of skin to avoid injecting into muscle.
For higher body fat, use a shorter pinch and a shorter needle. Adjust needle length and angle (usually 45–90 degrees) based on how much fat you can pinch.
Rotate sites within the same area to prevent tissue damage. Keep a simple log or grid to track locations and avoid injecting the exact same spot more than once every week or two.
Managing and Rotating Injection Sites
Rotate sites to avoid repeating the same spot. Use the abdomen, thigh, or back of the upper arm and move at least 1 inch (2–3 cm) from the last injection in that area.
Tips for Reducing Discomfort
- Prepare the skin. Clean the area with soap and water or an alcohol wipe. Let it dry to avoid stinging.
- Choose the right time. Inject when you are calm and seated. Tension can make injections feel worse.
- Pinch or stretch properly. For most people, pinch a fold of skin on the thigh or abdomen if you have thin subcutaneous tissue. Stretch the skin on the upper arm if needed.
- Use steady technique. Insert the needle quickly at the recommended angle and press the plunger slowly. Fast insertion and slow delivery lowers pain.
- Warm the pen. Hold it at room temperature for 30 minutes if it was refrigerated. Cold solution can increase sting.
- Switch needle length if needed. Talk to your provider before changing needle size to reduce pain without affecting dosing.
Preventing Lipodystrophy
- Rotate systematically. Keep a weekly map or use a chart. Move clockwise around the abdomen or use grid squares on the thigh to track sites.
- Avoid the same site within 1 month. Repeated injections close together raise the risk of fatty lumps or dents.
- Inspect skin before injecting. Don’t use areas with bumps, thickened skin, bruises, or open sores.
- If lumps appear, stop using that spot. Let affected areas heal for several weeks before returning.
- Report persistent changes. Tell your provider about skin thickening, pain, or uneven fat. They can advise on technique or refer you for care.
Signs of Injection Site Issues
Watch for local pain, swelling, redness, lumps, or skin color changes after injecting. Note how long symptoms last and whether they get worse or spread beyond the immediate area.
Common Skin Reactions
Mild redness, small bruises, or slight tenderness at the injection spot are common and usually fade in 1–3 days. A small, firm lump (localized swelling) can form under the skin; this usually softens over days if you rotate sites and avoid pressing or massaging the area.
Itching or minor burning may happen right after injection, especially if the pen was cold. If you see a larger bruise, growing redness, or the area feels warm, these signs suggest more than a simple reaction and need attention.
Track size and pain level with photos so you can compare changes over time. Don’t ignore anything that seems off—better safe than sorry.
When to Contact a Healthcare Provider
If you have increasing pain, spreading redness, or a fever over 100.4°F (38°C) within 48 hours of injection, reach out to your healthcare provider. These symptoms could mean you’re dealing with an infection that needs antibiotics.
Notice any hard, growing lumps or skin breaking down? Or maybe persistent bleeding, or a rash spreading over a large area? Seek help for those, too.
Call right away if you develop new or severe allergic symptoms like sudden swelling in your face, throat tightness, trouble breathing, or fainting. If you’re unsure, just report any unusual or worsening local reaction sooner rather than later.
Storing and Handling Semaglutide Safely
Store semaglutide somewhere with steady temperature and low light. Keep it away from kids and pets, and always double-check the vial or pen label for expiry and storage instructions.
Temperature Requirements
Unopened pens or vials should stay refrigerated at 36–46°F (2–8°C). Don’t freeze it—freezing ruins the medicine and you really don’t want to risk that.
After you open it, most pens or vials can stay at room temperature (up to 77°F/25°C), but only for a limited time. Check the product label for the exact number of days.
Keep the pen or vial in its original box to shield it from light. Don’t store semaglutide near heat sources like ovens, heaters, or sunny windows.
If the product got too hot or too cold, just toss it and get a replacement. Better safe than sorry, right?
Disposal of Syringes and Pens
Drop all used needles, syringes, and pens with exposed needles into an FDA-cleared sharps container. Never put loose sharps into household trash or recycling—seriously, don’t.
When your sharps container gets about three-quarters full, follow your local disposal rules. Some places have drop-off sites or mail-back programs, but if you don’t have those, put the closed container inside a sturdy, puncture-proof bin and label it before tossing it out.
Never recap needles by hand. Keep used sharps containers away from kids and pets until you get rid of them properly.
Consulting With Healthcare Professionals
Talk with your clinician to figure out the best injection site for your body and health. You’ll also need follow-up care to track side effects, dose changes, and injection technique.
Personalized Site Selection
Your clinician will review your medical history, current meds, and any skin issues before suggesting injection sites. If you use insulin, have scarring, lipodystrophy, or thin subcutaneous fat, they might steer you away from certain areas like scarred spots or thin arms.
Expect a plan that spells out preferred sites (abdomen, thigh, upper arm) and a rotation schedule. Your provider can show you exact two-inch zones to use, maybe even mark them during your visit, and point out areas to avoid.
They’ll also help with needle length and injection angle based on your body size, so the shot actually goes into the fat layer under your skin.
Ongoing Monitoring and Support
Set up regular follow-ups to check your weight, blood sugar (if you’re diabetic), and side effects like nausea or injection-site reactions. Your clinician should look over injection sites for redness, lumps, or infection and switch things up if you get lipohypertrophy or ongoing irritation.
If your injections start hurting or you notice poor absorption, ask for hands-on retraining. Don’t hesitate to request written or visual instructions, plus a plan for when to call (fever, severe pain, allergic reaction signs).
Your provider can coordinate dose adjustments and labs to keep you safe while you’re on semaglutide.
Frequently Asked Questions
Here are some clear, practical answers about where to inject semaglutide, how to do it, ways to avoid skin problems, and when it’s time to get medical help. Read through these for steps on site choice, technique, rotation, and warning signs.
Which areas of the body are recommended for subcutaneous injections and why?
Go for the abdomen, front thigh, or the back/outer part of your upper arm for subcutaneous injections. These spots have a nice layer of fat under the skin, which helps the medicine absorb slowly and evenly.
They’re easy to reach and let you pinch or hold the skin if you need to. Plus, there’s enough space to rotate sites and avoid beating up the same area over and over.
How do I choose between the abdomen, thigh, and upper arm for an injection site?
Pick a spot you can reach and actually see. The abdomen is usually the easiest for self-injection and gives pretty consistent absorption.
Use the thigh if you’d rather not expose your abdomen. The upper arm works if someone else can help or you’re handy with a mirror; it’s less common for self-injection. Honestly, it comes down to comfort, access, and picking a spot with healthy skin.
What is the correct technique for giving a subcutaneous injection safely?
Wash your hands, then clean the skin with an alcohol swab and let it dry. Pinch a fold of skin, stick the needle in at a 45–90 degree angle depending on needle length, inject steadily, then pull the needle out and press the spot for a few seconds.
Toss the needle in a sharps container right away. Never reuse needles—it’s just not worth it.
How often should I rotate injection sites to reduce irritation or lumps?
Move at least one inch (about two finger widths) away from your last injection spot each time. Don’t inject the exact same spot for several weeks.
Rotate within the same area (like different spots on your abdomen) before switching to another area. This helps you avoid lumps, hard spots, and irritated skin.
What should I do if I see redness, swelling, bruising, or pain at the injection site?
Mild redness, slight swelling, or small bruises usually go away in a few days. Try a cool compress and don’t rub the area.
If you see redness, swelling, severe pain, spreading warmth, fever, or pus, stop injecting there and contact your healthcare provider. Get help quickly for any signs of infection or allergic reaction.
Are there any areas I should avoid injecting into, such as scars, moles, or stretch marks?
Don’t inject into scars, hard or reddened skin, or anywhere you see active rashes. Steer clear of moles and broken skin too.
These spots can mess with absorption and honestly, they just bump up your risk for irritation or infection. If you see visible veins, fresh tattoos, or stretch marks, it’s best to skip those as well.
Go for healthy, smooth skin instead—your body will thank you.